Best of Both Worlds: Compositing Images

Sometimes, I have a set image in my head when I’m stooting… I know exactly where I want the negative space, how I want the focus and blur to appear, and where the shadows and highlights should pop. Sometimes, I just shoot, and see what I get taking the same shot with a variety of exposure and depth of field settings. Most of the time, I end up with at least one photo that has that magical combination of crisp and soft, color and texture, light and dark. But, there are times, like last week, where the shot with the composition I like isn’t quite right. Maybe the subject isn’t quite in focus or the lighting isn’t there. Another photo, has the right focus, but has mistakenly has a lens cap sneaking in from the side (How did that happen?). Luckily, with a few simple Photoshop compositing techniques, it’s simple to get the photo you are looking for.
Here’s an example from my recent Cookbook 411 post of Tayberry Sherbet.
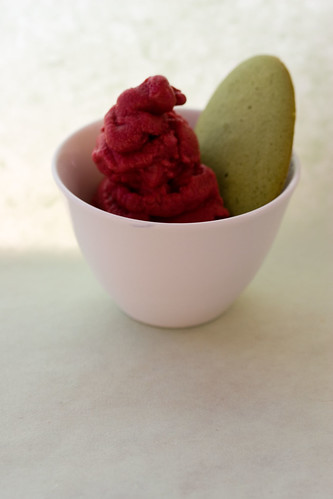
I loved the empty space on the bottom of the image… just right for adding a bit of text. But, look closely at the sherbet. It’s fuzzy. Too fuzzy to use. I almost tossed this image immediately, until I realized that somehow, it was the only one with this particular layout. The next photos I took had a spoon added into the shot:
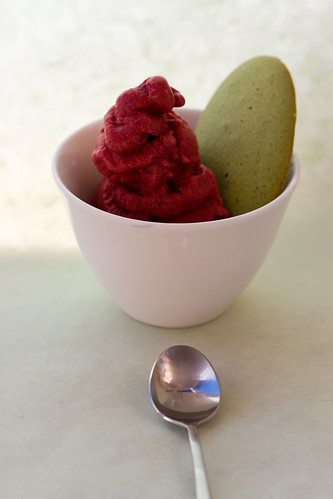
And, while I thought it was a good idea when I was taking the photo, it turns out I really didn’t like the spoon much at all. It just looked out of place… intentional without being interesting or creative. Ah, but the sherbet – it’s clear in the shot. The spoon needed to go.
There are several ways I could have removed the spoon… small objects I just remove with the healing brush or the clone brush. But a spoon this size would leave too many artifacts. Instead, I can combine the empty space from the first image with the clear sherbet of the second by using layers and a bit of creative layer masking.
To start, I open both images, copy the one without the spoon (I’ll call this one image A), and paste it as a new layer into the one with the spoon (B). Because I hadn’t moved the camera, but just added the spoon and fixed the focus, I don’t have to worry about getting the images lined up… but if I had nudged the camera at all, I would have to take some time to line up the images before proceeding.
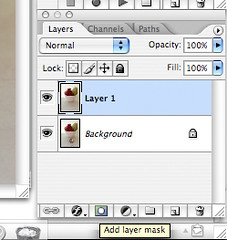
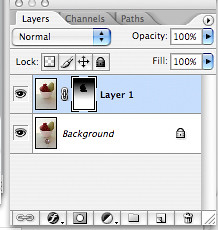
Next, I create a layer mask for the image A, in the layers palette. Layer masks create virtual holes in the layer, allowing the pixels from lower level layers to show through. Black allows them to show through completely and white keeps the masked layer intact. Greys, then, act more like transparent pixels and allow a bit of both the masked layer and the layers below. My goal is to keep the pixels from image B for the main subject, but the pixels from image A for the foreground.
One way to do this is to simply fill the layer mask with black, and then paint white over the area with the spoon. But, like the clone brush technique, that’s likely to leave artifacts… what I need is a smooth transition. A gradient mask works perfectly for this.

I select the layer mask by clicking on it, and then select the gradient fill tool. Then, I fill the layer mask with a black to white gradient, starting from just above the top of the sherbet, to just past the bottom of the bowl. The area around the sherbet in the layer mask is almost 100% black, allowing the in-focus sherbet to show through. The pixels start to blend over the bowl, and by the foreground, I’m just getting pixels from Image A. In a few areas of the sherbet, I also just paint on black to ensure the clearest pixels are exposed.
Now that I’m pleased with the composition, I find it simpler to go ahead and merge the two blended layers… while working with two full images as layers, the working size of the doc has doubled… merging the layers gets it back down to a more workable size.
After a bit more cropping, exposure correction and color tuning, here’s the final image, what I had hoped to actually shoot in the first place!

Technorati Tags: Food, Photography, Photoshop, Tips
It’s so interesting to me the things that you notice in your shots and what you look for in a good photo. Reading your blog is helping me learn to have a more discerning eye when it comes to the food shots that I take. (Not that my photos hold a candle to yours 😉 ).
Wow, so much thought and detail really does go into your stunning photographs. Thanks so much for the tips, I shall be putting them into practice in the future.
Thank you for the step-by-step explanations – I haven’t played around with masks too much, but I can definately see their value! The photo looks terrific!
So here’s my question I pose to you and also myself, am I a good food photographer or am I an average photographer and a good photoshop person? I understand that there are many times of food shots, color, lighting, clarity, shadow-light, blur, texture, etc.
I find that it’s frustrating to have to work in post to get the shot I wanted originally. It’s so much nicer to capture what I wanted in camera. I did this with a Thanksgiving set I created. Of course, it took about 20 shots to get that one that needed no post. Is this typical in food photography by the way?
Thanks for your reply-