Depth of Field and Bokeh

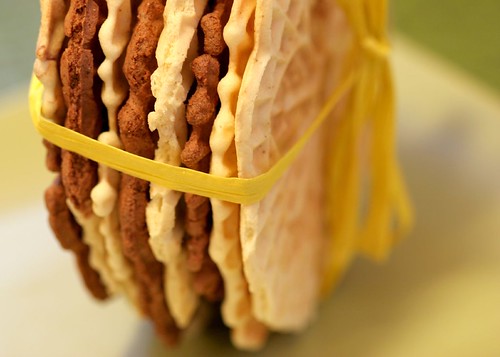
Bokeh is a Japanese term used to describe the quality of a background blur. Is it smooth or is it harsh? Do the colors and light blend together in silky, natural combination? Or are there wiry bits that look artificial?
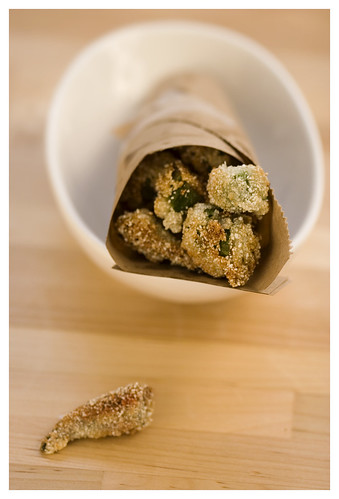
I’ve always loved photos that had extremely narrow depth of field (DOF), and marry a sharply focused subject with a creamy soft backdrop. It simplifies the photo and makes it both pleasing and understandable. Looking back through my photos, especially my food photos, a great number of them are shot with an aperture of 3.5 to 1.4.
However, I had never heard of bokeh or given much thought to how the blur looked until someone left a comment on one of my flickr photos inviting me to the Bokeh: Smooth and Silky group on Flickr. Now I am hooked and have started to look at my photos in a new light.
To understand bokeh you need to understand depth of field. Photos with a medium amount of depth of field feel natural to us because that’s our eyes see. Only the immediate subject is clearly in focus, and our peripheral vision is gently fuzzy. With a lens, the amount of blur is determined by the size of the aperture. There are lots of great technical descriptions of depth of field available, but I start yawning as soon as I start reading them and looking at the little diagrams of triangles pointing at each other.
All you really need to know is that depth of field is a combination of the aperture setting on your camera and the distance you are from the subject. If you are further away or you are shooting with a high f-stop (f10 or greater) you will have a wider depth of field, and more of the overall image will be clear and in focus. If you are closer or are shooting with the aperture wide open (f9 or below), you will have more background blur. Lower number, more blur. Higher number, more clear.
The best way to understand the variations between the stops is to shoot a lot and pay attention to the data when you are reviewing your photos. You won’t be able to tell whether you got what you wanted on the LCD on your camera. Shooting more photos is free and you will quickly learn what your preferred f-stop is with practice.
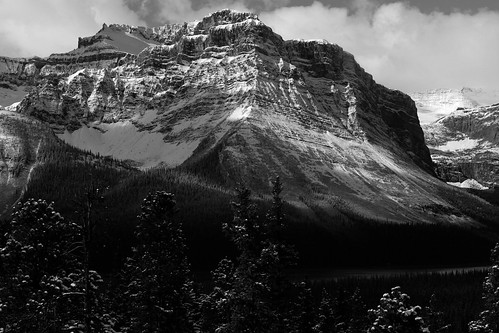
As a general rule in food photography, shooting with a greater depth of field is typically used most often for packaging. I tried to find one of my food photos that was shot at something higher than f8, but failed. I just never shoot food that way. But, here’s an f11 outdoor scene to give you a sense of greater depth of field.
Editorial food photography (ie, photos used for magazines, etc.) is typically shot with a medium to narrow depth of field. This is where bokeh comes into play, and is the difference between a good photo and a great one.
So, how do you get good bokeh? Unfortunately, the best way is to use the best lenses. Some lenses give better bokeh than others… of course, those tend to be the higher quality, more expensive lenses. If you are interested in understanding exactly how lenses create good and poor bokeh, check out this article.
Another is to play around with the aperture settings as you are shooting. Take lots of shots at slightly varying f-stops. I almost always take 3 to 4 shots of the same photo with aperture settings between 6.3 and 2.8 (or 1.4 if I’m using my 50mm) so I can select the one that looks best to me. More blurry doesn’t mean better bokeh… it’s about finding the best blur to balance the subject.
And, if you haven’t done it recently (or ever!), take your lenses and camera in to be cleaned. SLRs get dusty very quickly, and if you get dust on your sensor, it will show up in all of your photos and ruin a perfectly smooth background. If you are in the Seattle, I highly recommend Camera Techs in Ballard. They do a great job for very reasonable prices… only $39 to clean a digital camera sensor.
You also need to make sure you are focusing precisely on your subject. For macro photography of any kind, I have given up on autofocus. It just doesn’t allow me the control that I need. If you can, switch the camera into manual focus mode for anything that you shoot within a foot, and slowly adjust back and forth until you get just the right spot in focus.
If you want to attempt to smooth out your background after the fact, there is a great Lens Blur filter in Photoshop CS. It won’t give you 100% natural looking blur, but it does a decent job of adding bokeh in shots that you can’t retake or that could use just a touch of smoothing. There’s a great tutorial on using the Lens Blur to make an artificial Tilt-Shift effect which is basically what you need to do to simply blur the background. Instead of using the cylinder gradient, just use a straight dark to light. You also won’t want to use the same brightness settings suggested in that tutorial as it will make it look more artificial.
To get a better feel of bokeh, spend some time looking through the photos in these Flickr groups:
Bokeh
Bokeh: Smooth and Silky
Bokeh Galore
Fake Bokeh (for photos that use software to add their blur effects)
Watashiwa Bokeh
Technorati Tags: Macro, Photography, Tips
Wacky – I too had never heard of Bokeh – I’m going to have to spend some more time on flickr!
hello! thanks for this post, i found it very helpful. i haven’t played with my camera yet (it’s very new), but i’m glad to read that it won’t show up on my lcd–i wasn’t sure if it was me or my camera at fault.
Hi there,
I’m really new to photography in general and I have really been enjoying your shots on Flickr. This site is wonderful!! Thank you for sharing your tips.
I have tried to read books about photography and fully understand what you mean about diagrams being lifeless and dry.
I can’t wait to delve deeper into the content of your site.
I do the same type of photography that is discussed here,(I have a Canon D30), but I use mine as references for my paintings, so I want the pics sharp all through…the opposite of “background blur”!~ Could anyone suggest a good lens for this application?
Hi Anne,
Any lens will be able to do that, you’ll just need to crank the f-stop up to a higher #, and your depth of field will be much wider… that is, more of the photo will be in sharp focus. When you do that, however, the shutter speed will need to be much slower. Often to the point that you can’t handhold the camera without the whole image getting blurry from motion. You’ll need a tripod or some other type of support to hold the camera still.
-L
I came here because I was looking for the difference between bokeh and DOF, and your description was great. I was worried that my shots weren’t bokeh because you could still see the background, even though it was a shallow DOF with a really soft silky out of focus look… thanks to this, I feel like I am doing good bokeh after all! (at least, I hope so! LOL)