Correcting Exposure

Exposure is simply the ratio of light and dark in your photo. I find that regardless of how carefully I try to shoot, I always want to refine the exposure a bit.
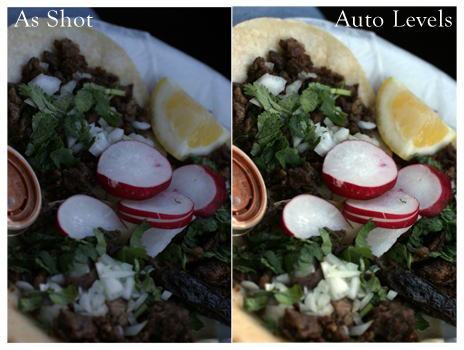
The easiest way to do this is to use the autofix (or autolevels) button in your software. You won’t get any control, but about 80% of the time it will give you a better photo than you started with, and you can be done and on your way. In Photoshop the auto level actually does more than a strict moving of the black and white points… it does a slight color adjustment too, and sometimes seems to bump the saturation. I usually try to do an auto level before I start hand-tuning to see if I like the results. On the rare occasion, it does a better job than I could do.
However, sometimes autofix doesn’t do the job… and you’ll need to manually adjust the levels yourself. This is far less scary than it sounds.
In Photoshop, you’ll want to add a new adjustment layer for levels (menu Layer->New Adjustment Layer->Levels) and not just go to the Levels menu item under Image. This will give you the greatest flexibility as you can go back and refine the adjustment after you’ve made any other corrections (like color). In iPhoto, the levels tool is under Adjust.
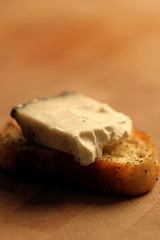
To adjust levels, you will be using a histogram. A histogram is a graphical representation of the light and dark values in your photo. This is the histogram for the before picture of the taco above.
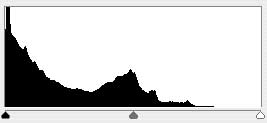
The left side of the graph represents the shadows, or dark regions of the photo. The right side, the highlights, or the light regions. The middle of the graph is the mid-range, sometimes called gamma. Your photo software will allow you to change at what point dark becomes black and light becomes white. In the graph above, the image has a lot of dark. If I selected the little black triangle and moved it to the right, the shadows in the image will get even darker. Since they are already pretty dark as the histogram shows, I won’t adjust them or I’ll end up turning more of the image pure black and will lose detail. This is called clipping. In the image below, you can clearly see this in the blueberries on the plate. They just look like little black blobs… not very appealing.
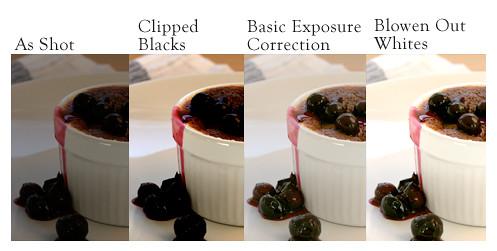
Now, if you look back in the histogram at the white triangle, you’ll notice that there isn’t anything immediately above it. In fact, it’s quite a ways from the first point in the graph. That point in the graph represents the lightest portion of the photo. Since there is a gap between that and the white point, it means that there are no pure white pixels in the image. While that might be fine in some special cases, typically, images will be more pleasing when they have both pure white and pure black. By moving the white triangle to the start of the graph, Photoshop will convert those pixels that are the lightest to pure white. Again, in the image above, the ramekin looks less grey when the lights are pushed to a pure white. Push that too far though, and again, you start to lose detail… the rim starts to disappear.
To make the most basic levels adjustment all you need to do is slide the black and white triangles to the ends of the graph. Just making that adjustment alone will make your photos look much better.
The next step is to adjust the gamma, or the mid-range, with the grey slider (it’s also called the “exposure” slider in some applications). This is a very subjective adjustment. Sliding to the left lightens the mid-tones and to the right darkens them. There isn’t a right direction… it’s all about what look you are going for. Once you’ve adjusted the mid-tones, you may also want to readjust the black or white points. These points don’t have to line up exactly with the ends of the graph. In fact, I often move them past the ends, sometimes even way past if it gives me the effect that I’m looking for. The result is always that I will lose some detail in those shades, but that is sometimes the look I’m going for.
The beautiful thing about exposure is that there is no right exposure, other than the one that looks the best to you. Not your viewers, not your critics. You. You are the artist, you get to decided what you want your photo to look like.
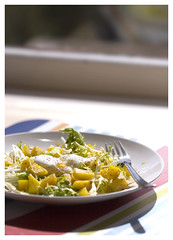
Many great food photographers adjust their photos so that they are technically over exposed, but they look fantastic nonetheless. Blowing out the lights makes a photo whiter and brighter, and sets a very high-intensity tone. Less frequently, you’ll see images that clip the shadows, although it can help the photo become even more dark and moody. It’s all about playing around to get what you want out of that specific image.
Here are some of my photos that I chose unusual exposure values. I think they work. What do you think?
Technorati Tags: Photography, Tips
Hi L,
I just discovered your second blog! Beautiful! And such a great source of information. This is an excellent idea! I look forward to reading your posts. I have a lot to learn a lot from lenses, exposures etc as I am about to buy a SLR camera with lenses 😉 I cannot wait!
I also saw the food stylist seminars you mentioned! If only I was closer to be able to attend!
Cheers
Hi L, I was trying to find a way of leaving a general comment for the whole site, but I couldn’t — anyway, it is great, and I think your food photog. is fantastic. Thanks for posting, I am going to bookmark it and do some reading …
Just a Q: why do you do EC in PS and not in ACR?
AJ
Hi AJ – thanks!
on the comment for the whole site thing – hmm. I hadn’t thought about that. I guess the only way to kind of do that is to leave a comment on my about page. But that’s kind of weird too.
On the Exposure correction point, I sometimes do a tiny bit of exposure correction in Adobe Camera Raw… but only to keep the histogram from falling off the edge. I prefer adjusting as a layer in Photoshop because I often go back and forth between levels, curves and color balance to get the look I’m going for. Often if I tweak the color of the highlights, it changes where I like to set the white point, for example. If I always tried to produce a technically “correct” photo, then I could probably do about everything in ACR… but I’m usually going for artisitc rather than correct (BTW – correct photography versus great photo will be an upcoming post shortly…)
Thanks for stopping by! And feel free to keep the questions coming!
To get a proper exposure from the moment you take the picture, I find it useful to refer to the histogram. For this, I found this video tutorial which is quite clear and helpful 🙂
This is a very important blog. I use this correction for my digital photos taken with canon eos 400D. My previous camera canon eos 10D did not have this problem but the eos 400D takes photos with histograms just the same as in the histogram on top of this page. Is there any clue that I can make a setting for the camera eos 400D to take pictures with correct exposure?
Hi Lara, I agree. A white table under a window always shows burnt areas. But, correctly exposing the food, it works.
And sometimes I like very much the shadows you get under exposing, similar to a baroque still live.
Both of your unusual exposure photos are fine.